Conditional Formatting, Excel
May 19, 2016
Using Excel Conditional Formatting Based on Another Column or Cell
Steps in this article will apply to Excel 2007-2016. Images were taken using Excel 2016.
Conditional formatting is a useful Excel feature that can help you quickly scan your data without resorting to complicated filtering or fussy charts. Often, you will use conditional formatting to call attention to cells that represent an outlying condition – such as too many days until delivery or too few items in inventory.
Here’s how to use conditional formatting to show us that an item in our store is getting low on inventory and we will need to re-order soon:
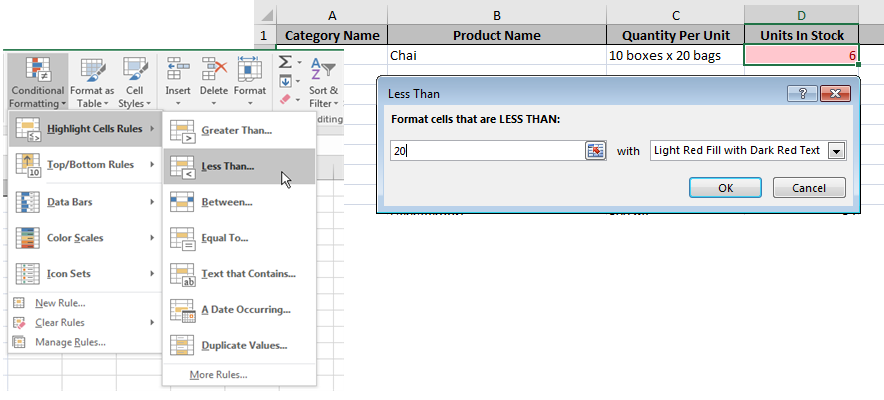
- Highlight the cell in the row that indicates inventory, our “Units in Stock” column.
- Click Conditional Formatting.
- Select Highlight Cells Rules, then choose the rule that applies to your needs. In this example, select Less Than.
- Fill out the Less Than dialog box and choose a formatting style from the dropdown. In Our example, we want the cell to change to red background and red text when the cell value is less than 20.
To follow using our example, download 03-Conditional Formatting Across Multiple Cells.xls
I’m sure you have already spotted a problem! There are many rows in our worksheet. Do I have to repeat the above for every cell in the column? Of course, the answer is “no” and Excel gives you a few quick ways to apply conditional formatting to multiple cells.
Select Your Range Before You Begin
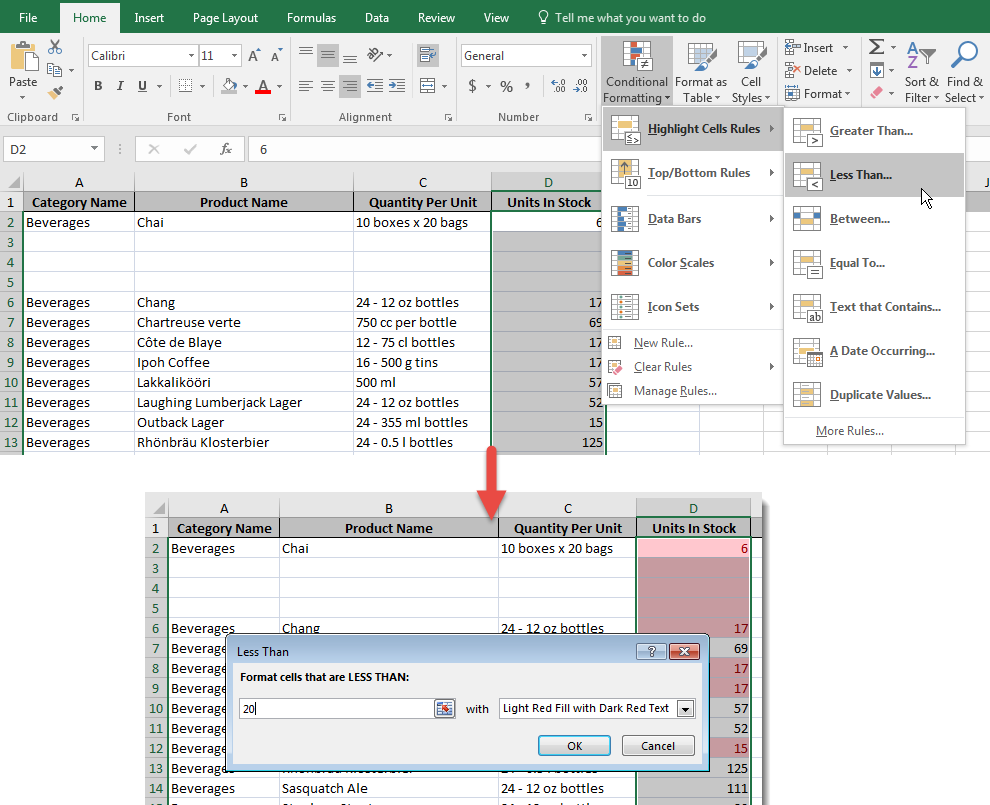
By far the easiest way to apply conditional formatting to an entire column or row of cells, is to select the entire range to which the formatting will apply, before you define your rule. To highlight every cell with a value below twenty in our example, your steps would look like this:
- Highlight all of the cells in the sheet to which you’ll apply the formatting rules. Do NOT select headings.
- Click Conditional Formatting.
- Select Highlight Cells Rules, then choose the rule that applies to your needs. In this example, select Less Than.
- Fill out the Less Than dialog box and choose a formatting style from the dropdown.
Edit the Rule
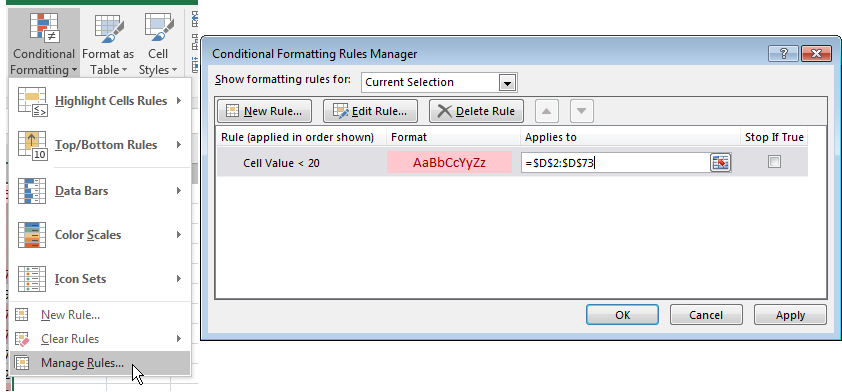
If you forget to select your range, or your range changes after you’ve applied the rule, you can modify it after the rule has been created:
- Place the cursor in any cell to which the conditional formatting rule applies.
- Click Conditional Formatting, then select Manage Rules.
- Click on the rule you wish to change. (If you don’t see your rule, you may not have selected a cell to which the rule applies. Click the Show formatting rules for: dropdown and select This Worksheet to see all rules.)
- Click inside the Applies to field.
- Type the new range of cells, or click the sheet button to click & drag your cursor around the new range of cells. When the Applies to field reflects the correct new range, click OK.
Click & Drag, Copy/Paste
Once a conditional formatting rule has been applied to a cell, the rule will also apply to any cell that is copied from the original. This means you can copy/paste the rule (along with its contents!) and even use the copy handle to drag and copy the rule. Caution! Just like any other formula, you will need to pay attention to your absolute and relative cell values so that your conditional formatting rules are applied correctly.
To delete your rule from multiple cells:
- Open the Rules Manager, select the rule and hit Delete Rule
To delete all rules from your sheet:
- Click Conditional Formatting > Clear Rules and select Clear Rules from Entire Sheet
For more information about how to apply conditional formatting based on formulas, and how to highlight entire rows of data, view this article: Get the Most Out of Excel’s Conditional Formatting


